In this activity we will discover some of the amazing features that MusicBlocks has to offer. When you open up your screen you will see something like this.
Go ahead and run what is in front of you, you can press the play button in the upper left-hand corner, or you can click on the yellow block that says start. Alternatively, you can press the snail icons to hear the music step by step or note by note. Now, lets create our own music!
Start off by clicking on the upper left-hand rhythm section. If you hover over each of the menu graphics on the left-hand side it will tell you the name of the collection of blocks in there. We will be dealing mainly with rhythm, pitch, and action. There are so many different things you can do with all of the items, but we will just focus on the blocks found in these collections.
We will start off in the Rhythm collection, click once to open it, then click and drag the block entitled “note value” onto your screen. It will expand to include the length of the note and the pitch. The smaller the fraction, the shorter the note will be. You can change the pitch from the do-re-mi scale into the c-d-e scale by grabbing the “sol” block and moving it to the center of the bottom of the screen. Hold it over the trash can icon until the icon has a red border, then release it. Then go to the pitch collection, click down about three times until you see the little icon that has a G on it. This indicates that it will use the note names of A, B, C, D, E, F, and G instead of Do, Re, Mi, Fa, Sol, La, Ti. You can do this a faster way by instead of clicking on note value then changing sol to G, going to Rhythm, then clicking the orange block that says G4. It will open up the note value block but with G already in there instead of Sol. I prefer to use the scale A B C D E F G instead of Do Re Mi Fa Sol La Ti because of the fact that when I read music, I was trained to read music by letters. For the remainder of this tutorial, I will be suing the letter notes. Play around with the pitch by changing the name and the octave by clicking on the numbers and names and selecting or typing new names or numbers. You have created your first note!
Go ahead and grab the top note value that was there when you opened the program and delete it by dragging it and dropping it into the middle of the bottom of the screen. Drag your note that you created up and put it inside the start block. It will “click” right in. Go ahead and add another note value block. We are going to turn this one into a simple chord. A chord is when there are two or more notes playing at the same time. To do this, we are going to click on the green pitch collection. Grab the first block that says pitch, then place it underneath the current pitch block. Go ahead and change the “sol” to “G” if you want. I have changed my chord to play C in the fourth octave and C in the third octave. This is what mine looks like up to this point.
Let’s add an action block now. Click on the yellow action collection and select the first option, action, and drag it out to your canvas (where we have been working). You will see a little blue box attach itself to the action block, you can change the name of the action block to whatever would be helpful for you to remember what is in the action block. Let’s call it chordtwo (with no spaces). Here is what it should look like now.
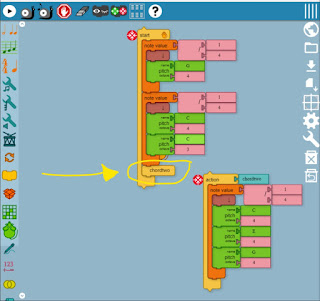
Let’s add a chord into the action block, add whatever chord you want, I am going to add a three note chord. Reminder, you add one note value then one or more green pitch blocks. Put them into the action block. Then, click on the action collection, and select the yellow chordtwo (or whatever you called it) block at the top and drag it to beneath the first chord we created. It should look like this.
This block will call the action block into action. Test it out by pressing the play button in the upper left hand corner and see what it sounds like!
Let’s create another action block. I am going to create one that has one note and call it notetwo. This is what it looks like now.
I can add the yellow action call block for notetwo underneath the call block for chordtwo. The action blocks are very useful. We can call them without having to re-write them by placing the yellow call action blocks in the order we want them. Let’s put another chordtwo then a notetwo underneath the current yellow call blocks we have currently. These are very useful if you want to use a repeating pattern in your song but you don’t want to re-create the whole thing.
In this song I might want to have the note notetwo repeat twice, so I could just add another call block underneath the existing one that I have. This is what it looks like now.
You can continue adding chords and notes to make your song. You can also experiment with all of the other amazing options that are available to you in MusicBlocks.
Have fun creating your masterpiece!


No comments:
Post a Comment