Monday, January 29, 2018

Trust

You know what's important about trust? Having something/someone to put your trust in! Proverbs 3:5-6 reminds and commands us to, "Trust in the Lord with all your heart and do not lean on your own understanding. In all your ways acknowledge Him and He will direct your paths."


Friday, January 26, 2018

PSA -- if you're sick, stay home!

Seriously, folks. This is not a "macho" issue, or a "I powered through it!" status opportunity. With the flu and cold season upon us, if you are sick, just stay home! Do not go to church, to school, to work! You do not know how many people you will come into contact with who cannot get sick--maybe they have a medical condition or are taking chemo or something.

This is on my mind because as my husband is awaiting brain surgery (in 3 days!) a co-worker of his came in to work today when he wasn't feeling good, and the rest of his family has a stomach bug. Seriously??? What was he thinking! He ended up going home early, but hopefully he hasn't infected his co-workers, especially my husband who CANNOT (please, Lord!) get sick right now.

Also -- employers, please take this nasty flu into consideration when your employee is not feeling well--really think long and hard before you guilt them into coming in regardless of what virus they're carrying around with them. You may be saving yourself from illness too!

Anyhow, enough for my rant. I'm just frustrated. Thankfully we have a God whose plan will succeed, and hopefully He will keep this illness from our family! :)

Amazing blue feathers!

Bird feathers run such a beautiful spectrum, from brilliant yellows and oranges to deep reds to outstanding blues! This week I was preparing a lesson for my 4-H Club and learned something amazing and new about bird feather colors and want to share with you!

Some bird colors are from pigments, much like our own skin and hair colors. Some are dependent on what they eat (kind of like people...remember when you fed your baby a diet really heavy in carrots and their skin took on that orangey tinge? Still makes me laugh a little!)

But...the BLUES!!! Think of a gorgeous blue colored bird -- bluebird, bluejay, indigo bunting...there are many...

These beautiful blue colors are not created by pigments, but rather by structure!! Think of a prism or something like that which allows white light to be split. Blue feathers are made to appear blue by the actual structure of the feather!

As I was reading, I saw that if you view these "blue" feathers when lighted from the front (as we usually see them) they appear beautiful blue, but if viewed while backlit, they will just have a dull color. Of course I needed to experiment with this...Check this out!!

See this beautiful blue-green feather!
 Here's how it looks when lit with regular light, from the front.

But when I held it up to a window,
so that it was backlit with sunlight, look how dull it is!

Those two pictures are the same feather, the same orientation, looking at it from the same side...the only difference being that the lighting in the first was just regular room lighting, and in the second it was lit from behind!  

I also tried it with a flashlight, with similar results!  
Looks so pretty in regular room light

When lit from behind the blues disappear...

This one shows the difference, same feather, just part is backlit and
part is lit from the front!

Anyhow, I thought that this was pretty cool and would recommend you looking into it further! Here are a couple of good resources for you to read more about it: https://academy.allaboutbirds.org/how-birds-make-colorful-feathers/  and https://www.smithsonianmag.com/science-nature/why-are-some-feathers-blue-100492890/


Homeschool Review Crew Weekly Link Up

Friday, January 19, 2018

Of braces and brain surgery...


Or maybe I should have said, what seems "big" to you?  :)  I am just thinking about the fact that a few months ago I was told that I had to get braces on my teeth NOW so that I wouldn't lose them from chipping each other too much (that post was here) -- I was quite unhappy and scared about the cost and pain (okay, I"m still a bit scared about the cost, but God will provide!)

Now my husband is looking forward to brain surgery in less than two weeks (he has trigeminal neuralgia).  Suddenly the braces are just another step in the road, another thing to do. His surgery has taken over our priorities and made the braces seem like a tiny thing.

Priorities change, values adjust, but God is there right with us, guiding and directing.  We need only to trust Him.  Prov 3:5-6, "Trust in the Lord with all your heart and lean not unto your own understanding.  In all your ways acknowledge Him and He shall direct your paths."

Thankful to have One who loves me directing our paths!!!

Homeschool Review Crew Weekly Link Up

Sunday, January 14, 2018

Cloth napkins! (easy tutorial)

We use cloth napkins.  We have for years and years and years.  Why? Well, first of all, it's not as wasteful--you can just pop them in with your regular laundry and voila--they're ready for the next use!  Another reason is that they really work better than paper napkins, we especially noticed this when our kids were little and really messy :) (or for messy meals like BBQ ribs!!)

I make our napkins, and they last years and years. We have some from when we were first married (20 years ago!!) and they are in good shape still :) A few years ago I made some from flannel (which I had left over from another project) and we learned that flannel napkins are the BEST!!  :) They are soft, yes, but they really soak up dirt/grease/wetness/etc -- all the stuff you need napkins to wipe off your fingers or face! I have been gradually making more, replacing the non-flannel ones with flannel napkins.

Here is the most recent batch of napkins! 


I thought I'd share with you how easy these are to make.

The first thing I do is go to the store and buy flannel (when it's on a good sale!)  I usually buy 1/2 yard for every 2 napkins I want to make (so for instance, if I want to make 6, I buy 1 1/2 yd).

Wash and dry the fabric in the washing machine so that any shrinking that will occur will do so before they are made.

It would probably be nice if you measured,
but I basically just do as thin as I can easily
do without burning my fingers :) 
Cut out squares of fabric. I like to make them 18 x 18 inches (though I've made them smaller before, too).

Fold over about 1/4" on each edge and iron it down; fold it a second time so that your raw edges are inside.


Fold it over the second time so your
raw edges will be inside


Stitch all around the 4 sides--then snip your threads and voila!  They are ready to use!


Simple, right?? (the worst part of it for me is the ironing!)

I am really making these to use. I don't really care if they are perfect or not. Therefore, I do not spend tons of time on them.  I usually don't have tons of time to spend, so that's practical for me :) If you are really concerned that they be perfect (like if you are giving them as a gift or something (?), you would probably measure how far you iron the edges in...and maybe mitre the corners...but for my family's breakfast/lunch/dinner usage, these are just great!

Since I'm not really "finishing" them nicely (no mitred corners, etc) I DO go in reverse over the folded overlapping corner parts to just flatten them so that they won't get lumpy when washed either. It looks something like this:


Give it a try!  It's a quick and easy project that you can all use!

How about you?  Does anyone else out there use cloth napkins?

Homeschool Review Crew Weekly Link Up

Wednesday, January 10, 2018

MusicBlocks Tutorial - Getting Started

My daughter is at it again...a follow-up to her previous post reviewing the MusicBlocks software...a tutorial you can use to familiarize yourself with the software and get yourself started with using it!  Give it a try! 

In this activity we will discover some of the amazing features that MusicBlocks has to offer. When you open up your screen you will see something like this.


Go ahead and run what is in front of you, you can press the play button in the upper left-hand corner, or you can click on the yellow block that says start. Alternatively, you can press the snail icons to hear the music step by step or note by note. Now, lets create our own music!


Start off by clicking on the upper left-hand rhythm section. If you hover over each of the menu graphics on the left-hand side it will tell you the name of the collection of blocks in there. We will be dealing mainly with rhythm, pitch, and action. There are so many different things you can do with all of the items, but we will just focus on the blocks found in these collections.

We will start off in the Rhythm collection, click once to open it, then click and drag the block entitled “note value” onto your screen. It will expand to include the length of the note and the pitch. The smaller the fraction, the shorter the note will be. You can change the pitch from the do-re-mi scale into the c-d-e scale by grabbing the “sol” block and moving it to the center of the bottom of the screen. Hold it over the trash can icon until the icon has a red border, then release it. Then go to the pitch collection, click down about three times until you see the little icon that has a G on it. This indicates that it will use the note names of A, B, C, D, E, F, and G instead of Do, Re, Mi, Fa, Sol, La, Ti. You can do this a faster way by instead of clicking on note value then changing sol to G, going to Rhythm, then clicking the orange block that says G4. It will open up the note value block but with G already in there instead of Sol. I prefer to use the scale A B C D E F G instead of Do Re Mi Fa Sol La Ti because of the fact that when I read music, I was trained to read music by letters. For the remainder of this tutorial, I will be suing the letter notes. Play around with the pitch by changing the name and the octave by clicking on the numbers and names and selecting or typing new names or numbers. You have created your first note!


Go ahead and grab the top note value that was there when you opened the program and delete it by dragging it and dropping it into the middle of the bottom of the screen. Drag your note that you created up and put it inside the start block. It will “click” right in. Go ahead and add another note value block. We are going to turn this one into a simple chord. A chord is when there are two or more notes playing at the same time. To do this, we are going to click on the green pitch collection. Grab the first block that says pitch, then place it underneath the current pitch block. Go ahead and change the “sol” to “G” if you want. I have changed my chord to play C in the fourth octave and C in the third octave. This is what mine looks like up to this point.


Let’s add an action block now. Click on the yellow action collection and select the first option, action, and drag it out to your canvas (where we have been working). You will see a little blue box attach itself to the action block, you can change the name of the action block to whatever would be helpful for you to remember what is in the action block. Let’s call it chordtwo (with no spaces). Here is what it should look like now.


Let’s add a chord into the action block, add whatever chord you want, I am going to add a three note chord. Reminder, you add one note value then one or more green pitch blocks. Put them into the action block. Then, click on the action collection, and select the yellow chordtwo (or whatever you called it) block at the top and drag it to beneath the first chord we created. It should look like this.


This block will call the action block into action. Test it out by pressing the play button in the upper left hand corner and see what it sounds like!

Let’s create another action block. I am going to create one that has one note and call it notetwo. This is what it looks like now.


I can add the yellow action call block for notetwo underneath the call block for chordtwo. The action blocks are very useful. We can call them without having to re-write them by placing the yellow call action blocks in the order we want them. Let’s put another chordtwo then a notetwo underneath the current yellow call blocks we have currently. These are very useful if you want to use a repeating pattern in your song but you don’t want to re-create the whole thing.

In this song I might want to have the note notetwo repeat twice, so I could just add another call block underneath the existing one that I have. This is what it looks like now. 


You can continue adding chords and notes to make your song. You can also experiment with all of the other amazing options that are available to you in MusicBlocks.

Have fun creating your masterpiece!

Tuesday, January 9, 2018

MusicBlocks Software

My 17 year old daughter is guest-posting on my blog today to tell you all about a great new tech product she has just learned about and used!  Check it out!

I recently had the opportunity to try out the MusicBlocks software from Sugar Labs and I really enjoyed it! I know how to play a few different instruments, and I have also taken a class in reading and writing music. Since I know how music works, it was very cool to be able to create my own music in a digital environment that was easy to navigate. I enjoyed being able to create my own music, and being able to transcribe music that was already written.

This is a start block that runs all of the action blocks.

The environment is quite similar to different environments that I have worked with before, such as MIT App Inventor or First Tech Challenge Blocks (in collaboration with Google). It is a simple drag and drop programming language, which is great for younger kids learning programming. This would be a great tool for teaching young kids (or even teenagers or adults) about how programming and music work together and relate to each other.

I really enjoy the different things that I can do with the program, I like that with the menu graphics you can easily tell what you are using. The guide that was included was super helpful. I liked that I could skip around it to get to what I wanted to learn about specifically. The guide covered most everything that I was wondering about, except I want to learn how to include the bass line in with the treble clef line that I have working on. I was a little bit frustrated by the fact that ctrl+c and ctrl+v didn’t work to copy and paste the blocks, that would have been helpful.

These are single notes with instructions on how the little mouse will move.
Using the MusicBlocks guide I learned how to make a program, I made one that plays the first bit of the MacGyver theme song with animated lines that change direction and length along with the song. I want to try to add some consistently to the lines and make them grow and shrink in height with the pitch of the notes that are being played. It would be very helpful for younger kids to be able to see this, and to understand the correlation between music and technology, and since this is a visual drag-and-drop programming language, it makes it easier than a line-by-line program would for them to understand what is happening with the program.

Here is what my final project sounds like. Here is a link to my project so you can see what it looks like. https://walterbender.github.io/musicblocks/index.html?file=MusicBlocks_MacgyverThemeSongBeginning.tb&run=True


I teach robotics programming to many kids in my community, I would love to teach a session to them using this program. I am going to tell my music teacher about this program, I think it could be useful to her, especially since her husband is in the programming field. I think that she could use this to show a visual representation of what is happening in the song with the notes. I feel that it is easy enough for anyone to learn, though it can get very complex, which I really like. I like it when a program can be used for simple projects, but then you can go deeper and deeper to get whatever kind of result you want. This software has that capability.

This is an example of a chord.
This program is very useful, but also super fun to use. This is the program that I created, the first part of the MacGyver Theme song. This is what part of it looks like, this is an action block that holds a few notes. I have indicated the note, the length of the note, and if there are any special things about the note, whether it ties to another note or is a dotted note, things like that. You can line action blocks up in a sequence to essentially “call” that block to play. I really like the fact that you could include chords.

Here is what the output of my music looks like. I increased the length of the line with each note or changed how much it turns, and this is what it looks like once the song is completed.

This is the design that I ended up with. It moved with the music.

I really enjoyed this program and I want to experiment with it quite a bit more. I really had a fun time working on this project and want to write my own music using this program. 


Monday, January 8, 2018

SchoolhouseTeachers.com -- my REVIEW (after a year of use!) of this great resource

Last year, in the middle of the schoolyear, I was introduced to SchoolhouseTeachers.com and was so impressed with this collection of online classes for different ages of students. I reviewed it on my blog here and if you read it, you will notice that I was really impressed, in an OOH! AAH! kind of way :) Well, today I'm writing another review of it to share that after a year of use, I am still just as pleased with this great resource!

High-quality, Self-paced, Online Homeschool Resources {SchoolhouseTeachers.com}

When you first take a look at SchoolhouseTeachers.com you will see that there is a huge amount of material on the site, courses for preschoolers through high schoolers (and some for parents, too!) When you look at the cost of the Yearly Membership I think you will be amazed at how reasonable the cost is for your family to use for the year. If you are familar at all with the prices of other online (single) courses, you will see the great value that this Yearly Membership offers for your family.

Last year I was excited to look through and anticipate the courses that my children would utilize.  Now after a year of use, let me tell you some of our favorites!

My daughter enjoyed the Geology course (she was in 7th grade last year). It is a good mix of video and audio as well as worksheets to accompany each lesson.
  

This year she's in 8th grade and has already finished the "Apologetics: Creation vs Evolution"

  
I really like the worksheets for the lessons--
it helps her to pay closer attention and she
can look back on them at a later time.


(kind of a slideshow format with video clips and audio accompaniment, and worksheets to go along with the lessons.  She enjoyed it and learned a lot, and it brought up some ideas that she was unfamiliar with, but will definitely encounter when she's talking with friends who are not of the same creation belief that she is. She is now moving onto "Addressing Cultural Issues," another in the Bible category.


She is also taking a health class, which is basically a read-something and fill in the worksheets--which is just what we needed for our curriculum goal for this year.

My middle son (10th grade) and my younger daughter (8th grade) are both working on spelling through SchoolhouseTeachers.com.  It is a basic spelling curriculum, learning the words, doing activities using the words, and being tested on them and moving on to the next lesson.  It seems to be working well for both of them. 

My son is also doing the "Economics" course, which is a mix of reading assignments plus other multimedia online resources.  It's a very youth-friendly course, and he seems to be enjoying it and learning too (he's used some of the concepts in his day to day talking about/debating things, so I can tell it's "sticking" :) .

The third SchoolhouseTeachers.com course my son is taking is a Bible course, the "Foundations for Teens" which is a series of video messages/lessons taught by many different teachers, dynamic, interest-catching videos of varying lengths (not too long though!) and then some evaluation/thought questions on the lessons.  Topics include things like: apologetics, identity in Christ, courage, who Jesus was/is, what Jesus said about ______ (lots of different lessons), decisions, and more.  All great applicable things for your teen (and you as well!)

SO...this is how our family is using it, and those courses are just a teeny part of the entirety of the SchoolhouseTeachers.com. I suggest you check out the site--look under "quick links" if you want to see all of the offerings.  If that big list of classes is too overwhelming, you can look by subject or age group.

This is an amazing resource, right??  Well, it's even more than what I've just described to you.  There is a connection with World Book, which your student can use to learn more about a variety of topics. When my daughter wants to learn more about just about anything, she checks this out first.  It is a searchable database and returns articles from World Book as well as different media related to the topic.

Other "extras" include things like an extensive video library. Some of the videos that are used in courses are ones that peole might like to view separate from the courses.  Some of our favorites are the Drive Thru History series. There is a parent section, with encouragement, courses for parents (think "how to parent your teenager", "On the homestead," and many many more.  There are lots of resources for parents as well--printable calendars, recordkeeping tools, menu planning, and more!

We've been using SchoolhouseTeachers.com for a year and really have not even scratched the surface.  The Yearly Membership  is an amazing value, even for the relatively little bit that we have experienced thus far!  I highly recommend it.  Really, whatever materials you are using to homeschool, this fits in the gaps so well, and you may find yourself creating your plan around these courses!  We're very pleased with it (obviously!) :) 

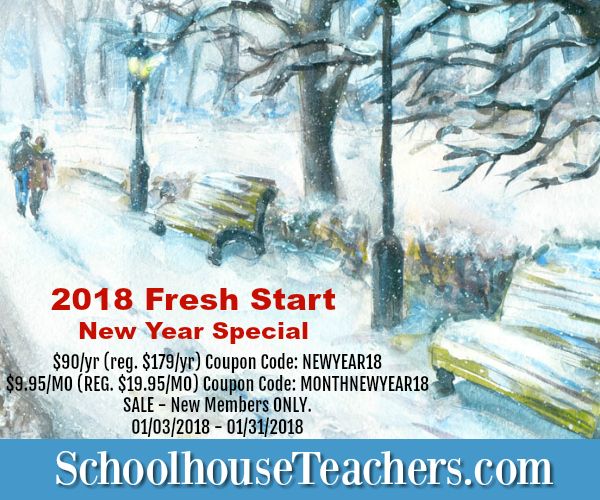
There's actually a really GREAT sale for the month of January (2018) for new members:
Schoolhouse Teachers 2018 Fresh Start New Years Speical


It's not just us who loves this resource!  To see what other homeschoolers think about SchoolhouseTeachers.com, please click on the link below! 

Homeschool Curriculum for Everybody - {SchoolhouseTeachers.com Reviews}

Crew Disclaimer


Saturday, January 6, 2018

Oh those nasty comparisons!


Wow, so it seems to me that once you've learned a lesson you're good, right? :) Yes, okay, so I'm being facetious :) Just remembering my post on COMPARISONS almost a year ago.  I know, I know...comparing myself to others is never a good thing.

Today's discouraged feelings thanks to comparisons focus on the robotics team that I coach.  We are a kind of low-tech team, one reason being that we don't have a lot of money and my husband and I (the coaches) are frankly NOT tech people :) So the kids are the ones who do all the building and programming.

They are doing really good this year...really!  And that's clear to me UNTIL I check out other teams around the country and realize how much better they are than we are (okay, I do have a bit of a competitive streak, so that's a hard reality to face!)

BUT BUT BUT I need to remind myself about the big picture.  These kids, these kids!!  They are learning to build a robot by themselves!  They are programming the robot by themselves!!  They are engineering, strategizing, working together, and growing themselves!!!  WOW!  This is the reason we agreed to coach this team, right? For our kids' learning and growth, not to win.  Well, winning would be awesome, but win or lose, I need to remember this wide-angle view :)


Homeschool Review Crew Weekly Link Up